Screw ups happen, even for us. With this post we’re starting a series that will focus on our brick and recovery stories. Today we’re showing you how we recovered our McLaren after our attempt to update it to a newer firmware didn’t go as planned…
Some backstory
We love to improve our prototypes by getting the best firmware for them. We learned that not all prototypes come with the best software after getting a McLaren without 3D touch. Like, really?
Luckily for us it wasn’t a hardware limitation, we just needed a different firmware version and some tinkering with the registry. We had already fixed the issue a long time ago but we had recently found a firmware that was even better. It’s usually a pretty straight forward operation but you have to keep in mind that the McLaren hardware is almost 4 years by now and hardware failures are to be expected. There’s been ongoing discussion about how old Samsung eMMCs are prone to an issue that causes them to become either partially or fully write protected over time. We suspect this is what happened to our McLaren.
The issues
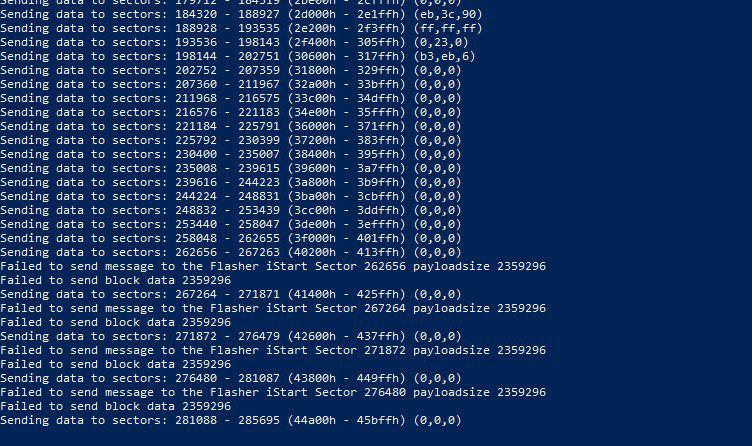
What this article is about is the story of our attempt to update our McLaren to a newer firmware. With a “normal Lumia” you’d just flash ffu file or download an OTA update, which we obviously couldn’t do, as there are no OTA updates and FFUs available outside Microsoft. We therefore have to use a backup we took from another phone and then “adapt” it. While this sounds rather easy, in practice our plan was foiled almost before even starting. With the help of the thor2 program we attempted to restore the backup, which seemed to work fine, until the McLaren suddenly stopped accepting write operations, spitting out IO errors instead.
Thankfully, the flashing process got far enough to not cause too much damage. It only failed after it had already written all the boot-critical partitions, so we could still boot the phone properly. As we said before, we had taken a backup from a different device to update our firmware and unfortunately, we found out that the phone had a different partition layout, which caused some issues:
- We weren’t able to boot the OS anymore.
- Because the backup was only flashed partially, the device was using the modem provisioning data and device settings from the other device. This caused the IMEI and UUID numbers to no longer match the actual ones on our device.
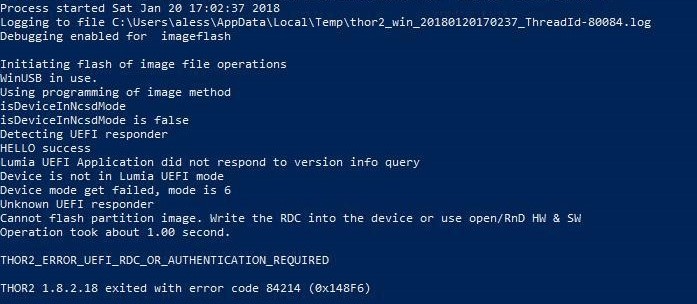
This causes issues with flashing operations, as this particular prototype didn’t have the SecureFFU fuse unblown, and was therefore only able to do unsecure flashing operations due to an “RD”-Certificate being present, which serves as an override to security checks. Unfortunately, this certificate is tied to several device specific IDs, some of which had now changed, invalidating the Certificate. Alas, we were now unable to restore the device to its original state, as it now behaved like a retail unit, disallowing anything but retail FFU flashes, leaving us with the question of how to fix this.
How to fix this?
We’re not going to lie, we initially thought we wouldn’t be able to salvage the device from this state anymore, however we’re not people who give up easily and kept trying to come up with some way to fix this.
We figured out that we were still able to enter EDMode (Emergency Download Mode), which allows us to flash so-called “Emergency Payloads”. These are used to flash a minimal firmware environment and put the device in a state where it’s ready to receive a FFU file. Small annoyances (like the fact that the phone automatically reboots from EDMode periodically) aside, we had no issue flashing the payloads, which resulted in us being able to reinstall the RDC without any further problems.
Coming back to our original plan: using the backup from another phone with a newer firmware to finally get all the cool 3D touch apps on our prototype!
..However, after we hit the same IO errors as before even after trying it for the second time, we came to believe that this was some kind of hardware issue related to the eMMC itself. So, we were left with a bricked device once again, having to go through the same recovery process again. Fantastic.
A problem after another

During all these shenanigans, we completely forgot about the battery percentage. In Lumias, charging is handled via drivers that aren’t available outside of Windows, only leaving a very slow safe charging mode that works in firmware. During flashing, the phone hardware consumes so much power that it actually depletes the battery, and we had dropped our device to 6% battery. With such a low charge, it’d be risky to flash a full backup, as the device would most likely shut down mid flash, with uncertain results.
We ended up flashing the DPP partition, which contained the problematic provisioning files just to ensure our phone wouldn’t be left in a bricked state, as EDMode is tricky in low battery scenarios as well.
With that out of our way, we embarked on the slow and tedious journey to actually charge the battery up to a safe level without being able to boot into a OS to do so.
Charging the battery
Initially, we wanted to rely on the firmware and the flash app to charge the phone, but this proved to be just too slow ultimately, crawling along with around 50mA, so we had to get creative.
When a Lumia phone battery is below 0%, the charge level is too low to even fully start-up the SOC. Hence, the device enters a mode called “trickle charge”, which slowly (in order to not damage the cells) charges up the battery just enough to let the SOC and firmware start-up. After that, “mobilestartup.efi”, the first part of the Windows Phone boot chain kicks in and handles charging until the phone has 3% battery power, at which point it continues the boot process.
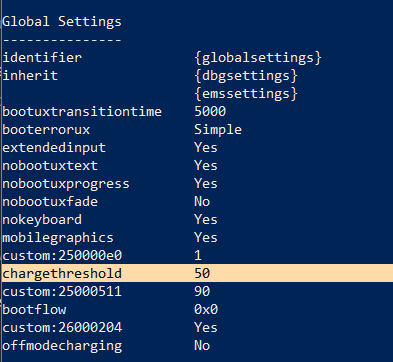
Our idea was to change that threshold in order to let “mobilestartup” charge the battery without having a working OS present, which proved to be rather easy to do. All we had to do was change a BCD option called “chargethreshold”, which we set to 50 to give us some buffer.
With our last few percent left, we flashed the modified EFIESP partition and crossed our fingers. After restarting the phone with the thor2 tool, the phone did indeed start to charge. By using a fast charger, we were able to get to 50% in about half an hour. Success!
How do we actually flash this phone?
Now, since we had the “RD Certificate” installed and it was now valid again, the phone allowed us to go into mass storage mode.
Full disclaimer: I’m generally against flashing phones using mass storage mode, use flash app as much as you can for this stuff since you have way more protections this way.
We started flashing partitions in mass storage mode, hoping that the 50% battery we had would be enough, and it thankfully was. After we were done, we rebooted the device, and it did boot further than we expected, but we weren’t quite ready yet, as the phone was stuck displaying a black screen.
We’ve seen this behavior in the past with phones where we reflashed partitions separately, as the MainOS (the partition containing the operating system) and Data (the data partition) are linked together. If something isn’t quite right between the two the phone can end up in a bad state.
Thankfully, the fix was one reset away, and we began “hugging” the phone for it to survive a reset (McLaren is very sentimental, but that’s an article for another day…).
We hope you enjoyed this type of post. Would you like more? Let us know in the comments below!
Leave a Reply